
Introduesing 2002 Jeep Tj Tailgate Hinge Plate Removal
The 2002 Jeep Tj Tailgate Hinge Plate Removal, known for its rugged off-road capability and classic design, is a vehicle that many owners cherish and maintain diligently. One common maintenance task that Jeep TJ owners might encounter is removing and replacing the 2002 Jeep Tj Tailgate Hinge Plate Removal. Whether you’re replacing a damaged hinge, upgrading to a more durable part, or performing routine maintenance, understanding the proper procedure for removing the tailgate hinge plate is essential. This comprehensive guide will walk you through the process, offering tips and safety precautions to ensure a smooth and successful removal.
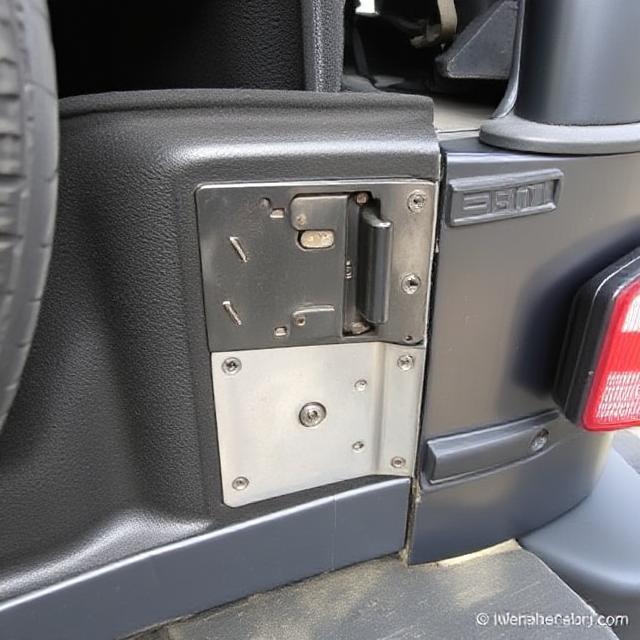
Understanding the 2002 Jeep Tj Tailgate Hinge Plate Removal
The 2002 Jeep Tj Tailgate Hinge Plate Removal on a 2002 Jeep TJ is a critical component that connects the tailgate to the body of the vehicle. It allows the tailgate to swing open and close smoothly. Over time, exposure to the elements, heavy use, or accidents can cause the hinge plate to wear out, crack, or become loose. Removing the hinge plate is necessary for repair or replacement.
The hinge assembly generally consists of:
- The hinge plate itself (mounted on the tailgate)
- Hinge pin (pivot point)
- Mounting bolts or screws securing the hinge to the vehicle body
Before starting, it’s helpful to gather the necessary tools and ensure you have a replacement hinge plate if needed.
Tools and Materials Needed
- Socket wrench set (typically 10mm, 12mm, or 14mm sockets)
- Flat-head screwdriver
- Phillips-head screwdriver (if applicable)
- Penetrating oil (e.g., WD-40)
- Rubber mallet (optional)
- Replacement hinge plate (if replacing)
- Safety gloves and goggles
- Clean cloth or rag
Step-by-Step 2002 Jeep Tj Tailgate Hinge Plate Removal Process
1. Prepare Your Workspace and Vehicle
Start by parking your Jeep TJ on a flat, stable surface. Engage the parking brake to prevent movement. Open the tailgate fully to access the hinge components. To prevent damage, it’s a good idea to place a tarp or protective cloth under the tailgate area.
2. Remove the Tailgate (Optional but Recommended)
While it’s possible to remove the hinge plate with the tailgate in place, removing the entire tailgate simplifies access and reduces strain. To do this:
- Support the tailgate with a friend or use a sturdy prop to prevent it from falling.
- Locate the bolts securing the hinges to the tailgate. These are usually accessible along the top and bottom of the tailgate interior or exterior, depending on the design.
- Use the appropriate socket and ratchet to remove these bolts.
- Carefully lift the tailgate away from the vehicle.
If you prefer to work with the tailgate still attached, proceed cautiously, supporting the tailgate and working in tight spaces.
3. Locate the Hinge Plate and Bolts
Identify the hinge plate on the tailgate. It is typically a metal plate attached with bolts or screws. Examine the mounting points to determine the size of the bolts (most likely 10mm or 12mm). Apply penetrating oil to these bolts to loosen any rust or corrosion, allowing easier removal.
4. Remove the Hinge Bolts
Using the appropriate socket size, carefully unscrew the bolts securing the hinge plate to the tailgate or body of the vehicle. Keep these bolts in a safe place if you plan to reuse them, or replace them if they are damaged or corroded.
In some cases, the bolts may be stubborn or rusted. Use a flat-head screwdriver or a rubber mallet to gently tap or pry if needed, but avoid forcing or stripping the bolts.
5. Detach the Hinge Plate
Once all bolts are removed, gently pull away the hinge plate from the tailgate or vehicle body. If the hinge pin is still attached, it may need to be removed separately.
Removing the Hinge Pin (If Necessary)
The hinge pin allows the tailgate to pivot. If the hinge pin is stuck or needs replacing:
- Locate the hinge pin on the hinge assembly.
- Use a punch or screwdriver and a hammer to tap out the hinge pin from the bottom.
- In some models, the hinge pin may be secured with clips or cotter pins, which need to be removed first.
- Carefully extract the hinge pin, avoiding damage to surrounding components.
Tips for a Smooth 2002 Jeep Tj Tailgate Hinge Plate Removal
- Use Penetrating Oil: Rusted bolts are common on older vehicles. Applying penetrating oil and letting it sit for 10-15 minutes can significantly ease removal.
- Work Gradually: Don’t force bolts or parts; instead, work gradually to prevent damage.
- Keep Track of Hardware: Organize removed bolts and parts for easier reassembly.
- Inspect for Damage: While removing the hinge plate, check for rust, cracks, or other damage that may require replacement parts.
Reinstallation and Replacement
After removing the old 2002 Jeep Tj Tailgate Hinge Plate Removal, installation of a new or repaired hinge is essentially the reverse process:
- Align the new hinge plate with the mounting holes.
- Insert and hand-tighten the bolts.
- Use a torque wrench to tighten bolts to manufacturer specifications.
- Reinstall the tailgate if it was removed, ensuring proper alignment.
- Test the tailgate operation for smooth opening and closing.
Safety Precautions
- Always wear gloves and safety goggles to protect against rust particles and sharp edges.
- Ensure the vehicle is securely supported when removing the tailgate to prevent accidental falls.
- Use appropriate tools and avoid forcing parts that are stuck, as this can cause damage.
Final Thoughts
Removing the 2002 Jeep Tj Tailgate Hinge Plate Removal may seem daunting at first, but with patience and the right tools, it’s a manageable DIY task. Regular maintenance and inspection of the hinge components can extend their lifespan and prevent costly repairs down the line. Whether you’re replacing a worn hinge or performing routine service, understanding the removal process ensures your Jeep remains in top condition.
If you’re unsure or uncomfortable performing this task yourself, consulting a professional mechanic is always advisable. Proper maintenance keeps your Jeep TJ reliable and ready for your next adventure.
Disclaimer: Procedures may vary depending on your vehicle’s condition and specific model variations. Always refer to the vehicle’s service manual for detailed specifications and torque settings.