
Introduction to Smokey Ash Brown Hair Color
Achieving the perfect smokey ash brown hair color can elevate your look with a sophisticated, cool-toned finish that complements many skin tones. Whether you’re a beginner or someone looking to refresh your current shade, this comprehensive step-by-step guide will walk you through the process to ensure a flawless transformation. From preparation to aftercare, here’s everything you need to know about dyeing your hair to a stunning Smokey Ash Brown Hair Color.
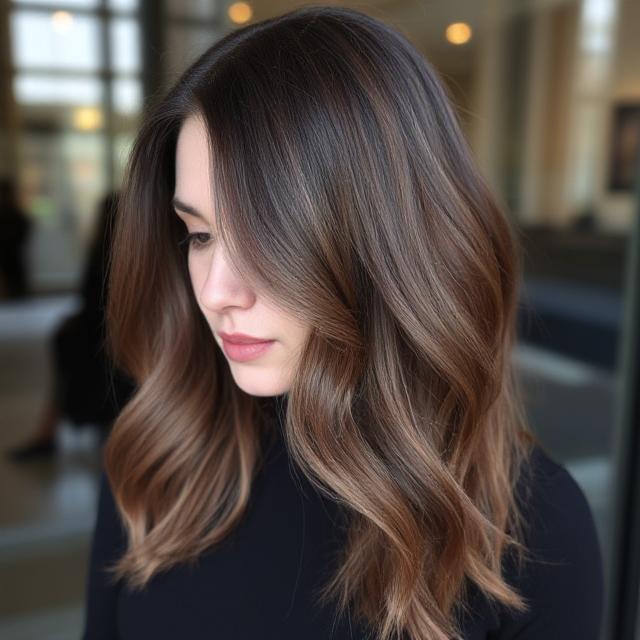
1. Understanding Smokey Ash Brown
Before diving into the dyeing process, it’s essential to understand what Smokey Ash Brown Hair Color entails. This shade combines cool, muted brown tones with a subtle smoky or ash finish, often characterized by icy undertones and a matte or velvety appearance. It’s perfect for those seeking a modern, chic look that minimizes warmth and brassiness commonly found in lighter browns.
2. Gather Your Supplies
Preparing the right tools and products is crucial for successful coloring:
- Hair dye kit: Choose a high-quality ash brown or Smokey Ash Brown Hair Color dye from reputable brands.
- Developer: Usually 20 or 30 volume, depending on your desired lift.
- Toning shampoo or ash toner: To enhance the ash tone and neutralize any unwanted warmth.
- Gloves: To protect your hands.
- Applicator brush and bowl: For precise application.
- Old towel or cape: To protect your clothing.
- Hair clips: To section your hair.
- Deep conditioner or repairing mask: For post-color nourishment.
- Timer: To track processing time.
- Vinegar or clarifying shampoo (optional): To remove product buildup before coloring.
3. Prepare Your Hair
Preparation is key for even color application:
- Perform a Strand Test: Before applying dye to your entire head, do a strand test on a small section. This helps you evaluate the color outcome and adjust processing time if needed.
- Wash Your Hair: Clean your hair 24-48 hours before dyeing. Avoid using conditioner afterward, as clean, oil-free hair allows for better dye absorption.
- Protect Your Skin: Apply petroleum jelly or a thick moisturizer along your hairline, ears, and neck to prevent staining.
- Gather Supplies: Set up your workspace in a well-ventilated area.
4. Mix the Dye
Follow the manufacturer’s instructions precisely:
- Combine the dye and developer in the bowl, mixing thoroughly.
- Add toner or toning shampoo if recommended, especially if you want to enhance the ash tones or neutralize warm undertones.
- Perform a patch test 48 hours before application if you haven’t already, to check for allergic reactions.
5. Section Your Hair
Divide your hair into manageable sections:
- Use hair clips to separate hair into four quadrants—two at the front and two at the back.
- Working one section at a time ensures even coverage and minimizes missed spots.
6. Apply the Dye
- Start applying the dye from the roots, working your way down to the ends.
- Use your applicator brush for precise application, ensuring each strand is coated evenly.
- Be thorough to avoid patchiness.
- For more uniform color, work through each section systematically.
7. Processing Time
- Once all hair is covered, set a timer according to the dye manufacturer’s instructions.
- Typically, processing takes between 30 to 45 minutes.
- Check the color development periodically, especially if you desire a cooler ash tone, to prevent over-darkening or brassiness.
- Keep hair warm (e.g., wrapping in plastic or a cap) to facilitate even processing.
8. Rinse and Condition
- Rinse your hair with lukewarm water until the water runs clear.
- Avoid using shampoo immediately after dyeing; instead, apply a color-safe or toning shampoo to maintain the cool tones.
- Follow up with a deep conditioning treatment or hair mask to restore moisture and reinforce hair health, as dyeing can be drying.
9. Tone and Neutralize
If the resulting color has unwanted warm undertones or brassiness:
- Use a toning shampoo or ash toner designed for Smokey Ash Brown Hair Color. These products contain violet or blue pigments that neutralize orange or yellow hues.
- Apply the toner as per instructions, usually leaving it on for 5-10 minutes.
- Rinse thoroughly and condition again.
10. Aftercare Tips
Maintaining your Smokey Ash Brown Hair Color is essential for long-lasting, vibrant color:
- Use color-safe, sulfate-free shampoos to prevent fading.
- Wash hair less frequently—2-3 times a week—to preserve the tone.
- Incorporate purple or blue shampoos weekly to combat brassiness.
- Keep hair moisturized with nourishing conditioners and masks.
- Limit heat styling to prevent damage and color fading.
- Schedule regular touch-ups: Ash tones can fade faster, so plan for root touch-ups and toner refreshers every 4-6 weeks.
Final Thoughts
Dyeing your hair to a Smokey Ash Brown Hair Color shade can be a rewarding process that results in a sophisticated, modern look. Patience and attention to detail during preparation, application, and aftercare are key to achieving professional-looking results at home. If you’re unsure or aiming for a significant color change, consulting a professional colorist might be a worthwhile investment to ensure the best outcome.
Embrace your new Smokey Ash Brown Hair Color with confidence, and enjoy the chic, cool-toned elegance it brings to your style!